Most landlords keep everything bundled into one long depreciation schedule because that feels simple. Simple also means slow. Almost like the property is paying you on its own terms. A real estate cost segregation study breaks that pattern and creates opportunities most landlords overlook.
And we are going to help you tap into those exact opportunities. You will see how the cost segregation study works and how to approach it without overcomplicating the process.
Everything You Need To Know About Real Estate Cost Segregation Study In Under A Minute
- A real estate cost segregation study accelerates depreciation for faster tax benefits.It separates property components into 5, 7, 15, or long-term depreciation categories.
- Accelerated depreciation increases cash flow and short-term financial flexibility.
- Front-loaded deductions help offset passive income across multiple properties.
- Cost and complexity vary by property type, size, and required professional cost segregation analysis.
- Following proper IRS guidelines and professional advice avoids costly mistakes.
- Retroactive studies can catch up missed depreciation, even for older properties.
What Is A Cost Segregation Study In Real Estate?

A real estate cost segregation study is a detailed analysis that breaks down a property’s components to identify assets that can be depreciated over shorter periods for tax purposes.
Normally, when you buy a building, the IRS requires you to depreciate it over 27.5 years for residential or 39 years for commercial real estate. A cost segregation study separates parts of the property – like lighting, flooring, cabinetry, or specialized equipment – into categories that can be depreciated faster – usually 5, 7, or 15 years.
Cost Segregation vs Straight-Line Depreciation: Understanding The Key Differences
Let’s look at the real differences between a real estate cost segregation study and straight-line depreciation and what that actually means for your numbers.
| Cost Segregation | Straight-Line Depreciation | |
| Depreciation Speed | Accelerated. Separates assets into shorter-life categories (5, 7, 15 years) | Standard. Spreads building cost evenly over 27.5 years (residential) or 39 years (commercial) |
| Tax Benefits | Higher upfront tax deductions. Improves early cash flow | Gradual deductions. Slower tax benefits over the life of the property |
| Complexity | Requires a detailed study and engineering analysis | Simple. Can be applied directly without additional study |
| Asset Breakdown | Identifies specific building components like flooring and fixtures | Treats the property as a single asset |
| Ideal For | – New construction- Recent acquisitions- Major renovations | Any property, especially when simplicity is preferred |
| Cost | Higher upfront cost due to professional analysis | Minimal; mostly bookkeeping or standard accounting |
| Risk/IRS Scrutiny | Higher. Must follow IRS guidelines carefully to avoid audits | Low. Well-established standard method |
How Does A Real Estate Cost Segregation Study Work?
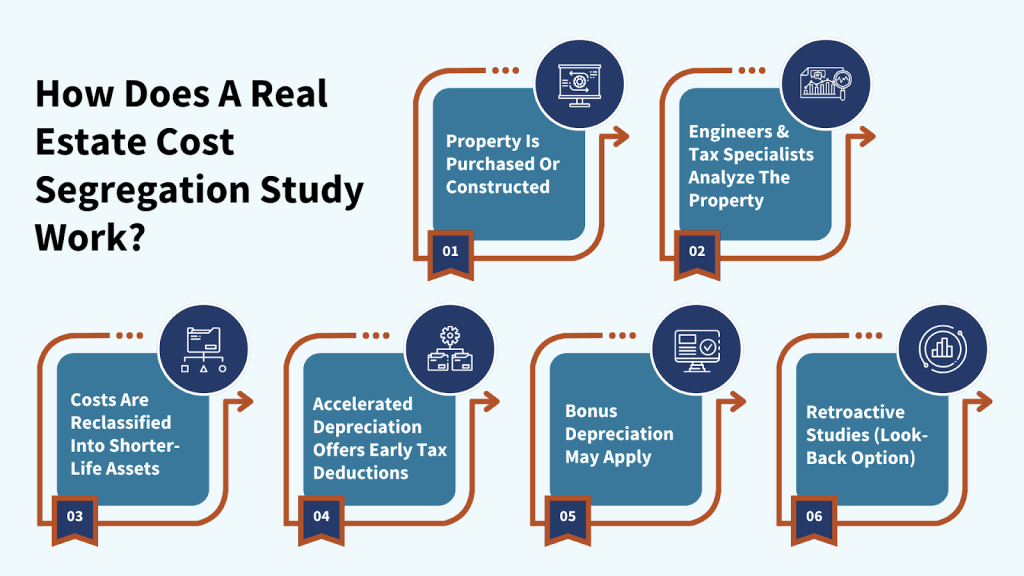
Here is how a real estate cost segregation study works and what goes into each stage.
1. Property Is Purchased Or Constructed
When you buy or build a property, the total cost is considered one asset for depreciation. So an office building worth $1,000,000 would normally be depreciated over 39 years.
2. Engineers & Tax Specialists Analyze The Property
Professionals (engineers + tax experts) perform the cost segregation study to:
- Review construction documents and invoices.
- Inspect the property (sometimes physically).
- Identify all building components.
3. Costs Are Reclassified Into Shorter-Life Assets
The cost segregation study separates components into categories.
Shorter Depreciation Periods:
- 5-year property: Carpeting, appliances, certain electrical systems.
- 7-year property: Furniture, fixtures.
- 15-year property: Landscaping, parking lots, outdoor lighting.
Long-Term (Unchanged):
Structural elements (walls, roof, foundation) still use
- 27.5 years for residential.
- 39 years for commercial.
In many cases, about 20%-35% of your property’s components can be reclassified into 5, 7, or 15-year assets. This shows how much of the property doesn’t need to be in that long timeline.
4. Accelerated Depreciation Offers Bigger Early Tax Deductions
When you shift portions of the building into shorter categories, you claim larger depreciation deductions earlier. This reduces taxable income in the first few years.
5. Bonus Depreciation May Apply
Under the Tax Cuts and Jobs Act, certain assets (5, 7, 15-year property) may qualify for bonus depreciation. This lets you deduct a large percentage (sometimes up to 100%) in year one.
6. Retroactive Studies (Look-Back Option)
Even if you have owned the property for years, you can still perform a study now and “Catch up” on missed depreciation using IRS Form 3115.
How Much Does A Cost Segregation Study Cost?

A quality cost segregation study costs about $5,000 to $15,000 for most standard properties. Some firms price it as a percentage of property value – usually about 0.3% to 4% of the property purchase price.
Here’s a quick breakdown:
| Property Type | Cost Range |
| Small residential rentals (single‑family, duplex/triplex) | $2,000–$6,000 |
| Standard commercial or mid‑size multifamily | $6,000–$15,000 |
| Larger commercial/complex properties (hotels, medical, industrial) | $15,000–$40,000+ |
| Very large or specialized facilities | $30,000–$75,000+ |
When Cost Segregation Study Might NOT Be Worth It:
- Very small properties (e.g., <$300K–$500K)
- If you can’t use the tax losses (due to passive income rules)
- If you plan to sell quickly
Why Cost Segregation Study Is Important For Real Estate Owners: 4 Key Benefits
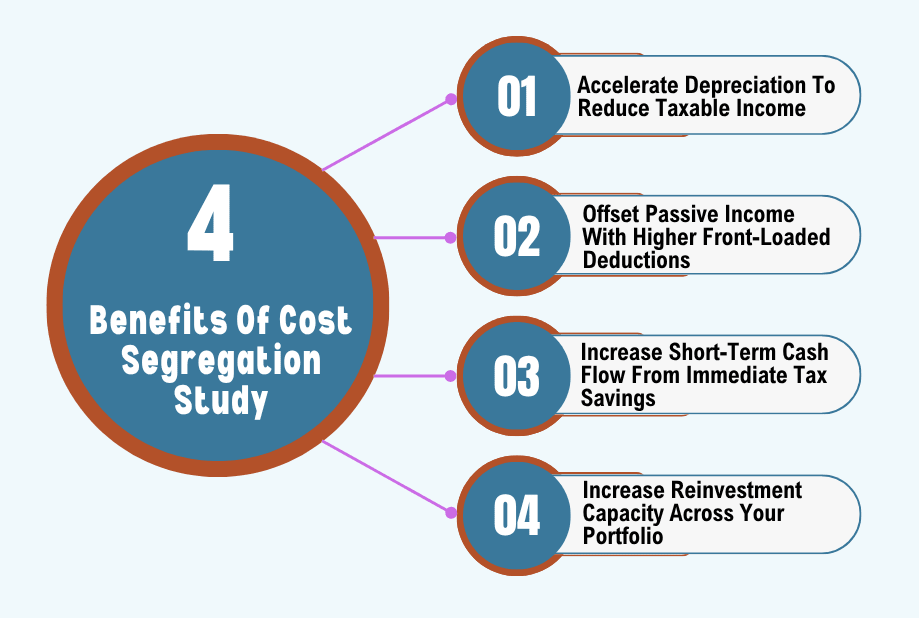
Here are 4 major benefits that show up clearly once a cost segregation study is in place.
1. Accelerate Depreciation To Reduce Taxable Income Early
Think about timing. Not just how much you save – but when you save it. Without any strategy, your tax deductions tend to trickle in slowly, almost like a drip. But when depreciation is accelerated, that drip turns into a front-loaded wave.
That matters because theearlier years of owning a property are usually the most financially demanding. You are stabilizing tenants and managing loan payments.
Having larger deductions early on means your reported income shrinks right when you need breathing room the most. Cost segregation shifts financial weight off your shoulders at the exact moment it feels heaviest.
2. Offset Passive Income With Higher Front-Loaded Deductions
If you own multiple properties – or even just one solid performer – you have probably noticed how income can stack up.
Front-loaded deductions let you absorb some of that income instead of letting it fully surface for income tax purposes. They become a cushion:
- Strong rental months don’t hit as hard on paper
- Portfolio-wide income becomes easier to manage
- You gain more control over how your overall numbers look
This becomes especially useful when your properties start doing well. Ironically, success can increase your tax burden, but this helps smooth that out.
3. Increase Short-Term Cash Flow From Immediate Tax Savings
Every dollar you don’t pay in taxes is a dollar you still control. And control is everything in real estate. Instead of sending that money out, you can build a reserve buffer and improve the property faster. For properties in the $1M to $5M range, first-year savings are somewhere between $40K and $200K+, which gives you real room to move early on.
The key idea here isn’t just “additional tax benefits.” You get to keep money moving inside your ecosystem. Real estate rewards momentum. When you keep more cash in your hands early, you stay flexible. And flexibility is what allows you to make smarter decisions instead of reactive ones.
4. Increase Reinvestment Capacity Across Your Portfolio
Real estate isn’t just about owning. It is about growing. And growth depends on how quickly you can recycle your capital. When more cash stays with you instead of going out, you can fund your next down payment sooner or move faster when a good deal appears.
In other words, you are in a position where your current properties actively help you acquire the next ones. And over time, that creates a compounding effect:
Property supports cash → Cash supports new acquisitions → New acquisitions expand income.
And when you zoom out, this matters more than ever. Around 80% of U.S. seniors own a home, while only 36.3% of those under 35 do, which shows how ownership and the benefits that come with it tend to concentrate over time.The way you manage cash today directly decides how far you can take your portfolio later.
How To Get A Real Estate Cost Segregation Study Done: 6 Easy-To-Follow Steps

Let’s look at 6 simple steps to get the cost segregation study done without the stress.
1. Confirm Property Eligibility Based On Asset Type & Timeline
Before you do anything, pause and ask: “Is this even worth doing for this specific property?”
Not every investment property makes sense here. Some situations just don’t justify the effort:
- Very recent flips where you are exiting quickly
- Properties with minimal improvements
- Assets you have already fully depreciated
Also, timing matters more than people think. The longer you have held the property, the more you need to check whether it still makes sense to go back and adjust things.
What To Do:
- Pull your purchase date and original cost (you will need both immediately)
- Estimate how long you plan to keep the property from today
- Check if major renovations or upgrades were done (these matter a lot). Do include structural shade additions or garden roofing kits upgradation, as they can be eligible for accelerated depreciation.
- Ask a CPA a simple yes/no: “Does this property qualify and still make sense?”
2. Define The Study Scope Based On Property Size & Complexity
Now you need to figure out the “how big is this project” question. A small residential property might need a relatively straightforward breakdown. A large commercial property is at a completely different level – more moving parts, more detail, more analysis.
If you don’t define the scope clearly, you will either overpay for something too complex or underscope and miss valuable components. You need to right-size the work before anyone starts.
What To Do:
- List total square footage and number of units (if applicable)
- Note any unique features (parking structures, custom interiors, etc.)
- Decide if you want a site visit or a document-based study
- Be clear whether this is for one property or multiple at once
3. Shortlist Qualified Cost Segregation Specialists With Proven Experience
This part matters more than most real estate investors expect. You are not just hiring someone to “run numbers.” You are trusting them to produce something that needs to hold up under scrutiny.
There is a big difference between a generic provider using templates and a team that actually understands construction details and tax treatment. You want people who have done this many times – and in properties similar to yours.
What To Do:
- Look for firms that specifically mention your property type in past work
- Ask how many reports they have delivered in the last 12 months
- Get a sample cost segregation report to see the level of detail
- Check whether they handle questions if issues come up later
4. Request A Detailed Proposal With Timeline, Deliverables, & Fees
This is where you slow things down a bit and get everything in writing. A good proposal should tell you exactly what is going to happen and when. If it is vague, that is a red flag. You are looking for clarity on:
– What you will receive
– How long it will take
– What it will cost (and if anything could change that)
What To Do:
- Get a fixed-fee quote rather than hourly
- Make sure the proposal states the delivery date clearly
- Confirm what exactly is included – site visit, final report, supporting docs
- Clarify if post-delivery support is included or extra
5. Review The Final Report With Your CPA For Tax Filing Alignment
Once the report is done, don’t just file it away. This is where it actually becomes useful. Your CPA needs to take what is in that report and work it into your tax strategy properly. The report alone doesn’t put money back in your pocket. Using it the right way does.
What To Do:
- Send the report to your CPA immediately after receiving it
- Schedule a call (don’t rely on email alone)
- Ask how it impacts your current vs future filings
- Confirm whether any prior-year adjustments are needed
6. File Required Forms & Implement Depreciation Adjustments With The IRS
This is the final step where everything becomes official. Up until now, it has been analysis and planning. Now it actually shows up in your tax filings. Depending on your situation, this can mean updating current-year depreciation or making adjustments that catch up on missed deductions.
What To Do:
- Confirm exactly which IRS forms you need (usually Form 4562)
- Double-check all numbers before submission. Mistakes can cost time and money
- Make sure future filings continue using the updated depreciation schedule
- Get professional legal help to add an extra layer of clarity before finalizing everything
4 Common Mistakes Landlords Make With Real Estate Cost Segregation

Let’s discuss 4 cost segregation mistakes that can show up, so you don’t end up paying for someone else’s oversight.
1. Misjudging The Recapture Impact Before Selling The Property
Many property owners love the upfront thrill of reducing their tax bill with cost segregation, but then forget about the “back-end” surprise: depreciation recapture. People usually assume the IRS won’t come knocking, or that selling a property is simple math – but recapture can easily wipe out some of your early gains.
How To Fix: Before doing the study, sit down with your CPA and run some “what if” scenarios for selling. Factor in recapture and compare it against your long-term holding plan. If a sale is likely, consider strategies like a 1031 exchange to defer the hit.
2. Relying On Outdated Tax Rules Or Assumptions
Some landlords act like the tax code never changes – maybe they read a guide from five years ago or rely on advice from a buddy who “did it last year.” The problem is that depreciation rules and allowable asset classifications shift all the time. Following outdated rules can drastically reduce your expected benefits and even cause compliance issues if the IRS audits you.
How To Fix: Always double-check the current year’s rules with a CPA who actively works on cost segregation. Even a short conversation can clarify what is still valid and what has changed.
3. Skipping Professional Review & Trying DIY Cost Segregation
DIY might sound tempting, especially if your property seems “simple.” But misclassifying a wall as personal property or missing subtle distinctions between land improvements and building components can cost you big time. It is the kind of mistake that can trigger audits or penalties.
How To Fix: Hire a specialist who actually understands construction details and IRS requirements. It might look like an extra upfront expense, but an expert professional maximizes depreciation deductions, and you usually end up saving more money than you would spend.
4. Failing To Plan Around State-Level Tax Treatment Differences
Even if you sort out everything federally, each state treats depreciation very differently. Take a property in Hilton Head Island, South Carolina. South Carolina doesn’t fully conform to federal bonus depreciation rules, which means even if your cost segregation study gives you a big upfront deduction federally, you may have to add some of that back when filing at the state level.
Now compare that to a property in Dallas, Texas, where there is no state income tax at all. Same study. Same numbers on paper. Completely different outcome in your pocket.
How To Fix: Check with a CPA who understands both federal and state rules. Map out how your state will treat accelerated depreciation before starting the study. That way, you know exactly what your net benefit is and don’t get blindsided when state returns are due.
Conclusion
A real estate cost segregation study only works when you treat it as part of how you manage the property overall. Timing matters. The type of property matters. Your hold strategy matters.
So work with people who know how to do it right and keep your documentation clean. And always stay involved in the process so you understand what is happening at every step and maximize tax savings.
We built RentRedi for landlords to keep everything connected in one place. You can collect rent online with autopay, reminders, and flexible payment options that keep things consistent month after month. Payments can clear in as little as two days, and everything is tracked in real time.
You can list units across major platforms and sign leases digitally without switching systems. Our screening tools help you connect with tenants who pay reliably, so on average, RentRedi-screened tenants deliver rent up to 17 days faster.
Maintenance stays organized through a single dashboard where tenants can submit requests with photos and updates, and you can coordinate vendors without back-and-forth. On top of that, your financials stay clean and ready. You get property-level reports and tax-ready documents without going through spreadsheets.
Get started with RentRedi today and see the difference for yourself.